




Most people can’t say how many accounts they’ve created across the internet. Old forums, abandoned developer profiles and half-finished social networks all stay online under the same handle, and attackers use that handle to link them. Sherlock OSINT on Android lets you run that same check from your phone: you give it a username, and it tells you which platforms have a profile under that name. This guide walks through a clean install inside Kali NetHunter via Termux, fixes the $PATH error most people hit, and shows how to turn raw results into a privacy-hardening plan.
Who this is for: Beginner-to-intermediate users who already have Termux and a Kali NetHunter chroot running, and who want a repeatable mobile workflow for username-based reconnaissance.
What Sherlock Does (and Doesn’t Do)
Sherlock is an open-source Python tool that takes one or more usernames and requests the profile URL for each username on hundreds of websites. If a site returns a valid profile page (based on the HTTP status code, redirect behavior, or an error message in the page body), Sherlock reports a hit.
| Sherlock does | Sherlock does not |
|---|---|
| Find out if a username is available on supported websites. | Prove the account belongs to a specific person |
| Output profile URLs for manual review | Access private data, passwords or messages |
| Run many checks concurrently | Bypass login walls or privacy settings |
| Export findings to TXT, CSV or XLSX | Guarantee zero false positives |
Key point: A match means “an account with this name exists.” It does not mean “this account is the target.” Treat every result as a lead to verify, not a conclusion.
Prerequisites & Lab Setup
Before you start, confirm the following.
| Requirement | Details |
|---|---|
| Android device | Android 8+ recommended, with at least 4 GB free storage (the NetHunter chroot is large) |
| Termux | Installed from F-Droid (the Play Store build is outdated and unmaintained) |
| Kali NetHunter | Chroot already installed and launching correctly (NetHunter rootless or full) |
| Network | Stable Wi-Fi or mobile data; Sherlock sends hundreds of requests |
| Target | Your own username, or one you have written authorization to assess |
Quick sanity check from Termux:
nh --version 2>/dev/null || echo "nh launcher found"Tip: If
nhisn’t recognized, your NetHunter install is incomplete or the launcher isn’t in Termux’s$PATH. Make sure to complete this step first, or the following steps may not work properly.
Step-by-Step Installation
Step 1: Enter the Kali NetHunter Environment
From the Termux prompt, launch the chroot:
nhExpected result:
┌──────────────────────────────────────────────┐
│ Termux                                       │
├──────────────────────────────────────────────┤
│ ~ $ nh                                       │
│ Starting Kali NetHunter...                   │
│                                              │
│ ┌──(kali㉿localhost)-[~]                     │
│ └─$                                          │
└──────────────────────────────────────────────┘
The prompt changes from ~ $ to a Kali-style prompt. Everything from here runs inside Kali, not in Termux.
Note:
nhopens a session as the default Kali user. If you need a root shell, usenh -r. You can follow this tutorial using a standard user account that has sudo permissions.
Step 2: Clone the Official Sherlock Repository
git clone https://github.com/sherlock-project/sherlock.git┌──(kali㉿localhost)-[~]
└─$ git clone https://github.com/sherlock-project/sherlock.git
Cloning into 'sherlock'...
remote: Enumerating objects: ...
Receiving objects: 100% ... done.
Resolving deltas: 100% ... done.
Why clone if we’re installing with pipx later? The clone gives you the full source, the supported-sites data and the documentation. It’s useful for reading the code, checking which sites are supported, and contributing fixes. The pipx install in Step 4 is what puts a clean sherlock command on your system.
Step 3: Update Package Indexes
sudo apt update
┌──(kali㉿localhost)-[~]
└─$ sudo apt update
Get:1 http://http.kali.org/kali kali-rolling InRelease
Fetched ... kB in 5s
Reading package lists... Done
Building dependency tree... Done
An outdated package index is a common cause of “unable to locate package” errors. Always refresh before installing.
Step 4: Install pipx
sudo apt install pipx -yWhy pipx instead of plain pip?
Modern Debian and Kali releases follow PEP 668, which marks the system Python as “externally managed.” If you run pip install against it, you’ll see something like:
error: externally-managed-environment
× This environment is externally managed
This is deliberate. Installing Python packages system-wide can overwrite libraries that Kali’s own tools depend on and break them. pipx solves this by giving each application its own isolated virtual environment while still exposing its command globally.
| Approach | Isolation | Risk of breaking system tools | Clean uninstall |
|---|---|---|---|
pip install (system) | None | High | Messy |
python -m venv + manual activation | Yes | Low | Manual |
pipx install | Yes (automatic) | Low | pipx uninstall |
Step 5: Install Sherlock with pipx
pipx install sherlock-project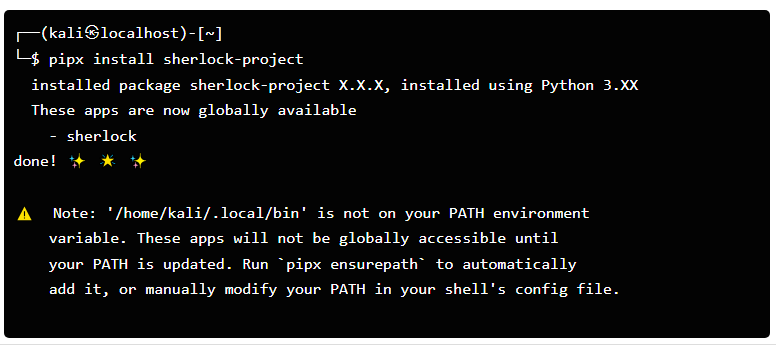
The version numbers will differ on your device. Read that warning closely. It’s the cause of the most common failure in this workflow.
Step 6: Fix the $PATH Error (sherlock: command not found)
If you try to run Sherlock right away:
┌──(kali㉿localhost)-[~]
└─$ sherlock --help
bash: sherlock: command not found
Why this happens
pipx installs the executable into ~/.local/bin. Your shell only runs programs located in directories listed in $PATH, and a fresh Kali chroot often doesn’t include ~/.local/bin. The tool is installed correctly; your shell just doesn’t know where to look.
The fix
pipx ensurepath
source ~/.bashrc
┌──(kali㉿localhost)-[~]
└─$ pipx ensurepath
Success! Added /home/kali/.local/bin to the PATH environment variable.
Consider adding shell completions for pipx. Run 'pipx completions' for instructions.
You will need to open a new terminal or re-login for the PATH changes to take effect.
┌──(kali㉿localhost)-[~]
└─$ source ~/.bashrc
┌──(kali㉿localhost)-[~]
└─$
Using zsh? Recent Kali builds default to zsh. If
source ~/.bashrcdoesn’t help, runsource ~/.zshrcinstead, or simply exit and re-enter withnh.
Verifying the Installation
Confirm the binary resolves:
which sherlockResult:
┌──(kali㉿localhost)-[~]
└─$ /home/kali/.local/bin/sherlock
Then check the help menu:
sherlock --helpusage: sherlock [-h] [--version] [--verbose] [--folderoutput FOLDEROUTPUT]
[--output OUTPUT] [--csv] [--xlsx] [--site SITE_NAME]
[--proxy PROXY_URL] [--json JSON_FILE] [--timeout TIMEOUT]
[--print-all] [--print-found] [--no-color] [--browse]
[--local] [--nsfw]
USERNAMES [USERNAMES ...]
Tip: Flags vary slightly between versions. Your own
sherlock --helpoutput is the source of truth for what your install supports.
If you see the usage text, you’re ready.
Running Target Reconnaissance
Basic Username Search
sherlock example_userAuthorization reminder: Replace
example_userwith your own handle or one you’re authorized to assess.
Illustrative output
The example shown below demonstrates how the command output might appear when you run it. The usernames, sites and results are fictional and will differ from real runs.
┌──(kali㉿localhost)-[~]
└─$ sherlock example_user
[*] Checking username example_user on:

[+] Bluesky: https://bsky.app/profile/example_user.bsky.social
[+] GitHub: https://github.com/example_user
[+] Medium: https://medium.com/@example_user
[+] Reddit: https://www.reddit.com/user/example_user
[+] Pinterest: https://www.pinterest.com/example_user/
[+] SoundCloud: https://soundcloud.com/example_user
[+] Steam: https://steamcommunity.com/id/example_user
[+] Wattpad: https://www.wattpad.com/user/example_user

[*] Search completed with 8 results
Sherlock also saves a text file named after the username (for example example_user.txt) in the current directory, containing each hit’s URL.
How to Read the Output
| Symbol | Meaning |
|---|---|
[*] | Informational status line |
[+] | Possible match: a profile appears to exist at this URL |
[-] | No profile found (shown only with --print-all / verbose output) |
[!] | Error on that site (timeout, blocked request, etc.) |
Practical Use Cases & Key Flags
Flag Reference
| Flag | Purpose | Example |
|---|---|---|
--print-found | Show only positive matches | sherlock --print-found example_user |
--output FILE / -o | Save results to a named text file | sherlock -o results.txt example_user |
--csv | Export results in CSV format | sherlock --csv example_user |
--xlsx | Export results as an Excel spreadsheet | sherlock --xlsx example_user |
--folderoutput DIR / -fo | Save per-user output files into a folder | sherlock -fo ./reports a b c |
--timeout SECONDS | Max wait per request | sherlock --timeout 15 example_user |
--site NAME | Limit the search to specific sites | sherlock --site GitHub example_user |
--proxy URL | Route requests through a proxy | sherlock --proxy socks5://127.0.0.1:9050 example_user |
--browse | Open found profiles in a browser | sherlock --browse example_user |
--nsfw | Include adult sites in the check | Off by default |
Use Case 1: Export Results to CSV
sherlock --csv example_user┌──(kali㉿localhost)-[~]
└─$ sherlock --csv example_user
[*] Checking username example_user on:
[+] GitHub: https://github.com/example_user
[+] Reddit: https://www.reddit.com/user/example_user
...
[*] Search completed with 8 results
┌──(kali㉿localhost)-[~]
└─$ ls
example_user.csv example_user.txt sherlock
A CSV is easier to sort, filter and review, especially on a small screen. You can open it later in a spreadsheet app or check it quickly from the shell:
head -n 5 example_user.csvUse Case 2: Check Multiple Aliases in One Command
People rarely use one handle everywhere. Pass several usernames separated by spaces:
sherlock example_user example.user exampleuser_dev[*] Checking username example_user on:
[+] GitHub: https://github.com/example_user
...
[*] Search completed with 8 results
[*] Checking username example.user on:
[+] Medium: https://medium.com/@example.user
...
[*] Search completed with 3 results
[*] Checking username exampleuser_dev on:
...
Each alias gets its own output file. Combine with a folder so reports stay organized:
mkdir -p ~/reports
sherlock --csv -fo ~/reports example_user example.user exampleuser_dev
Use Case 3: Focus on Specific Sites
If you’re verifying one platform after a cleanup, there’s no need to re-scan everything:
sherlock --site GitHub --site Reddit example_userFiltering False Positives
False positives are the biggest accuracy problem in username enumeration. Common causes:
| Cause | What it looks like | What to do |
|---|---|---|
| Common or short usernames | Dozens of hits for names like john or alex | Use distinctive handles; cross-check profile details |
| Sites that return “200 OK” for everything | Hit appears, but page says “user not found” | Open the URL manually and confirm |
| Soft-block or login walls | Result flips between runs | Re-run with --site and a higher --timeout |
| Different person, same handle | An account may be active but belong to someone else | Review the profile picture, bio, language, and past posts to compare accounts |
A reliable verification routine for each hit:
- Open the URL in a browser.
- Confirm the profile actually exists (not a placeholder page).
- Compare identifying details (profile photo, bio, linked sites, writing style, join date).
- Only then record it as a confirmed match.
Network Behavior and Rate Limits
Sherlock fires a lot of requests quickly. On a phone, especially over mobile data, you may notice:
- Timeouts when the connection is slow or a site is throttling you. Raise
--timeout(for example--timeout 30). - Inconsistent results if sites rate-limit or block repeated requests from the same IP.
- Battery and data use: a full run touches hundreds of sites. Prefer Wi-Fi for long sessions.
If the results seem incorrect or incomplete, wait a short time before trying again instead of sending repeated requests to the same websites.
Note on proxies: A proxy changes where requests appear to come from, but it does not change the ethics or legality of what you check. Only use proxy or Tor routing in ways that comply with the rules of the networks and sites involved.
Updating and Removing Sherlock
Site rules change constantly, so keep the tool current:
pipx upgrade sherlock-projectTo remove it cleanly:
pipx uninstall sherlock-projectOne advantage of using pipx is that Sherlock runs separately from other Python tools. This means you can update or uninstall it without affecting other software on Kali Linux.
Defensive Perspective: Turning Findings into Privacy Hardening
Sherlock is most valuable when you point it at yourself (or your organization, with approval). Attackers do this same lookup before phishing or social engineering. Running it first shows you what they’d find.
A Practical Self-Audit Workflow
- Enumerate. Run Sherlock against every handle and variation you’ve used, and export to CSV.
- Classify each hit into one of three buckets:
| Category | Description | Action |
|---|---|---|
| Active & needed | Accounts you use regularly | Harden settings, enable 2FA |
| Active but unnecessary | Still alive, no longer useful | Delete the account |
| Dormant / forgotten | Old accounts you’d lost track of | Recover, then delete or lock down |
- Close the gaps. For every account you keep:
- Enable two-step verification (2FA) to add an extra layer of security to your account. Using an authenticator app or a physical security key is generally safer than receiving codes through SMS.
- Use a unique password stored in a password manager.
- Review privacy settings: profile visibility, searchability, tagging, location sharing and public friend lists.
- Remove personal details from bios (employer, city, birth date, linked accounts).
- Delete what you don’t need. An abandoned account is an unmonitored attack surface. It can be taken over, scraped or used for impersonation without you noticing.
- Standardize going forward. Consider using different handles for professional and personal identities so one search can’t link them.
- Re-audit on a schedule. Check your account security every few months and update your settings whenever you receive an alert about a major data breach.
For Security Professionals
In an authorized engagement (a red-team assessment, an executive exposure review, or a company-wide awareness exercise), username enumeration helps you:
- Quantify how much of a staff member’s public footprint is linkable by handle.
- Spot possible impersonation attempts by looking for fake profiles on platforms your organization does not officially use.
- Feed findings into awareness training: “here’s what an attacker sees in five minutes.”
Always keep scope, written authorization and data-handling rules documented, and store results securely.
Ethical Disclaimer & Legal Compliance
Read this before using any technique in this guide.
This guide is intended only for ethical security auditing, self-footprint assessments, and defensive intelligence gathering. Use Sherlock on:
- Your own usernames and accounts, or
- Targets for which you have explicit, documented authorization (for example, a signed scope agreement).
Use these methods responsibly. Never use them to invade someone’s privacy, threaten them, expose their personal information, pretend to be them, or cause harm. Searching for a private individual’s accounts without their knowledge and consent can violate privacy and harassment laws, platform terms of service, and professional codes of conduct, depending on your jurisdiction.
Public availability of information does not make every use of it lawful or ethical. You are responsible for understanding and following the laws and the terms of service that apply to you. The author and publisher are not responsible for any improper or harmful use of the information provided in this guide.
Quick Reference Cheat Sheet
# 1. Enter Kali NetHunter (from Termux)
nh

# 2. Get the source
git clone https://github.com/sherlock-project/sherlock.git

# 3. Prepare the system
sudo apt update
sudo apt install pipx -y

# 4. Install Sherlock in an isolated environment
pipx install sherlock-project

# 5. Fix PATH if you see "command not found"
pipx ensurepath
source ~/.bashrc

# 6. Verify
which sherlock
sherlock --help

# 7. Run a self-audit
sherlock --print-found --csv your_username
Troubleshooting Table
| Symptom | Likely cause | Fix |
|---|---|---|
bash: sherlock: command not found | ~/.local/bin not in $PATH | pipx ensurepath then source ~/.bashrc (or ~/.zshrc) |
error: externally-managed-environment | Used pip on system Python | Use pipx install sherlock-project |
Unable to locate package pipx | Stale package index | sudo apt update, then retry |
nh: command not found | NetHunter launcher missing | Reinstall or repair NetHunter in Termux |
Many [!] errors / timeouts | Weak connection or rate limiting | Switch to Wi-Fi, raise --timeout, retry later |
| Hit exists but page is “not found” | False positive | Open manually and verify |
| Fewer results than expected | Outdated site definitions | pipx upgrade sherlock-project |
Frequently Asked Questions (FAQ)
1. Can I run Sherlock on an Android device without root access?
Yes. Running Sherlock through Kali NetHunter inside a standard Termux PRoot environment does not require device rooting. PRoot sets up a separate Linux-like file system within the user environment. This allows you to use Linux command-line tools on Android without making changes to the device’s system partitions.
2. Why do I get a “command not found” error right after installing Sherlock with pipx?
This occurs because the default binary directory where pipx places global entry points (~/.local/bin) is not yet added to your shell’s active $PATH variable. To fix this immediately, run:
Bash
pipx ensurepath
source ~/.bashrc
This updates your environment variables so the terminal can locate the sherlock command from any directory.
3. Why does Sherlock sometimes show false positives during username lookups?
Sherlock operates by querying specific URL endpoints across hundreds of platforms and analyzing HTTP response codes (such as 200 OK versus 404 Not Found), response content, and redirect behaviors. If a platform alters its routing mechanism, enforces strict CAPTCHAs, or returns a generic error landing page with a 200 status code, Sherlock might register the profile as active even if it does not exist.
4. How can I export my Sherlock search results directly to my Android device’s internal storage?
By default, Sherlock stores its text output in the current working directory of your terminal. To export the findings in an organized format, you can use the --csv flag:
Bash
sherlock <username> --csvTo transfer the resulting file from your NetHunter environment to your phone’s visible storage, copy it to your shared internal storage directory via Termux:
Bash
cp <username>.csv /sdcard/Download/5. How much time does Sherlock need to complete a full username search when using mobile data?
Because Sherlock queries hundreds of services asynchronously, a standard scan typically takes between 60 to 180 seconds on a stable mobile or Wi-Fi connection. Scan speed depends primarily on network latency, DNS query speeds, and individual platform rate-limiting protections.
6. Is it legal and ethical to scan usernames using Sherlock?
Yes, provided it is conducted within legal and ethical boundaries. Sherlock strictly aggregates publicly accessible, open-source intelligence (OSINT) and does not bypass authentication layers or exploit server vulnerabilities. Performing self-audits to map your own digital footprint, conducting authorized security engagements, or analyzing public accounts for defensive posture assessment is entirely standard cybersecurity practice.
If you are interested in Network Scanning, read our article: Complete Nmap Guide: Network Scanning, Service Enumeration, NSE, Output Analysis, and Security Auditing. And to learn about Kali tools, check out this Best Kali Linux Tools.
Complete Video Guide
Conclusion
Running Sherlock on a phone is a fast way to see your own digital trail. The setup is only a few commands: enter NetHunter, install pipx, install Sherlock, and run pipx ensurepath so your shell can find it. The real value comes afterward, when you review each hit, delete what you don’t need, and lock down what you keep. Run the audit on yourself first, and do it again every few months.