



Website reconnaissance is the first stage of any security assessment: before you test anything, you learn what is actually there. A few basic commands can tell you which IP address a domain points to, which ports a server answers on, which CMS powers the site, and whether obvious security settings are missing.
This guide walks through those four steps in the order a security professional would take them, using only example targets and non-destructive checks. It is written for beginners, Kali Linux learners, developers and website owners who want to understand what an outsider can see.
Authorization rule: Only run active reconnaissance against websites, servers and networks you own or have explicit written permission to test.
What is website reconnaissance?
Website reconnaissance (also called recon or information gathering) is the process of collecting publicly observable facts about a website and the systems behind it, so you can understand its attack surface before deciding what to assess or fix.
Typical findings include:
- The IP addresses a domain resolves to
- Which network ports are open and what services answer on them
- The CMS, web server and JavaScript libraries in use
- Missing or weak security settings such as absent HTTP headers
- Files and paths the site reveals on purpose or by accident
A defender uses this to find and close gaps. An attacker uses the same facts to pick targets, which is why site owners benefit from seeing their own site this way.
Passive vs active reconnaissance
Passive reconnaissance collects information without sending probing traffic to the target, while active reconnaissance interacts with the target directly and can leave traces in its logs.
| Passive | Active | |
|---|---|---|
| Contact with target | None, or ordinary public lookups | Direct requests and probes |
| Examples | Reading public DNS records, WHOIS data, search engine results, the site’s public pages | Port scans with Nmap, technology scans with WhatWeb, Nikto scans |
| Detectable by target | Rarely | Often, through logs and alerts |
| Permission needed | Generally not, though policies vary | Yes, always |
The boundary is not perfectly sharp. A DNS lookup is routine internet traffic, while a port scan is clearly a probe. Everything from Step 2 onward in this guide is active.
Before you scan: authorization, logs and the law
Warning: Test only websites, servers, and networks that belong to you or that you have clear permission to examine. Always get authorization before performing security scans or other active testing. Get that permission in writing.
Active reconnaissance is not invisible. Port scans and technology scans show up in server, firewall and intrusion-detection logs, and they can trigger alerts or automatic blocks. Unauthorized scanning may also breach your hosting provider’s acceptable use policy, your employer’s rules, or computer misuse laws, which differ by country and region. The Nmap project’s own legal guide advises getting written authorization before scanning anyone else’s network.
Safe places to practice include your own website or lab, intentionally vulnerable training machines, and hosts whose owners invite scanning. The Nmap project publishes scanme.nmap.org for light test scans. In this article, example.com stands in for “a target you are authorized to test”, and all terminal output is illustrative, not from a real scan.
Website Reconnaissance Step by Step
Step 1: Find a website’s IP address with ping
To find a website’s IP address, run ping example.com. The first line of output shows the IP address your computer resolved the domain name to.
A domain name is a human-friendly label. When you type it, DNS (the Domain Name System) looks up the IP addresses it points to. A domain can have one address, several addresses, and separate IPv4 and IPv6 addresses. Ping then sends small ICMP echo requests to one of them, so reading the address from its output is a quick side effect of testing reachability.
ping example.comor,
ping -c 4 example.comOn Windows, use ping -n 4 example.com. Here is what the output looks like.
# ILLUSTRATIVE EXAMPLE ONLY, not a real scan
PING example.com (203.0.113.10) 56(84) bytes of data.
64 bytes from 203.0.113.10: icmp_seq=1 ttl=57 time=14.2 ms
64 bytes from 203.0.113.10: icmp_seq=2 ttl=57 time=13.9 ms
...
--- example.com ping statistics ---
4 packets transmitted, 4 received, 0% packet loss
Real Example:
Command Prompt
-----------------------------------------------------------------------------------
C:\Users\jahid>ping -n 4 labs.jahidshah.com

Pinging labs.jahidshah.com [104.21.68.156] with 32 bytes of data:
Reply from 104.21.68.156: bytes=32 time=38ms TTL=56
Reply from 104.21.68.156: bytes=32 time=24ms TTL=56
Reply from 104.21.68.156: bytes=32 time=77ms TTL=56
Reply from 104.21.68.156: bytes=32 time=24ms TTL=56

Ping statistics for 104.21.68.156:
    Packets: Sent = 4, Received = 4, Lost = 0 (0% loss),
Approximate round trip times in milli-seconds:
    Minimum = 24ms, Maximum = 77ms, Average = 40ms

C:\Users\jahid>
The address in brackets on the first line (104.21.68.156 here, a range reserved for documentation) is the resolved IP. The reply lines show whether the host answered and how long it took. This method work on every device like Linux, Windows and macOS.
Alternatives: nslookup and dig
Both tools query DNS directly and are better for reading DNS data, because they do not depend on the target answering ICMP.
nslookup example.com
dig example.com
dig +short A example.com
dig +short AAAA example.com
dig +short A prints only IPv4 addresses and AAAA prints IPv6 addresses. If several lines come back, the domain resolves to multiple addresses.
Why ping can fail when the website is up
A failed ping does not mean the website is down. Many servers, firewalls and cloud providers block or ignore ICMP echo requests. A site can serve web pages on port 443 while ignoring ping entirely, so “request timed out” only tells you the host did not answer ICMP.
What the IP address does and does not tell you
The address you see is where the domain points, which is not always where the website’s files live. It may belong to a CDN, reverse proxy, load balancer or shared hosting platform, such as Cloudflare or a cloud provider’s edge network. That front layer receives your request and forwards it to the origin server, whose address is not revealed by an ordinary lookup. Seeing an IP address therefore does not mean the origin server has been exposed. Results can also differ by location and over time, because DNS can return different addresses for different visitors.
Step 2: Scan open ports with Nmap
Nmap (Network Mapper) is a free, open-source tool that checks which network ports on a host accept connections and can identify the services behind them. Run nmap example.com against a target you are authorized to test, and it reports open ports from a default list of the 1,000 most commonly used TCP ports.
Reminder: Scan only systems you own or have explicit permission to test. Nmap is a legitimate security tool, but scanning systems you do not own or have permission to test may violate their rules or local laws.
What ports are and why open ports matter
An IP address identifies a machine, and a port number identifies a specific service on it, much like a building address and an apartment number. A web server listens on port 80 or 443. A port is “open” when something is listening and accepting connections.
Open ports matter because every exposed service is something that must be patched, configured and monitored. A web server that exposes only ports 80 and 443 has a smaller attack surface than one that also exposes a database or an admin service to the internet.
The two basic commands
nmap example.com
nmap -Pn example.com
nmap example.comfirst checks whether the host is up (host discovery), then scans the common ports. If the host does not respond to discovery probes, Nmap may report that it appears to be down and skip the scan.nmap -Pn example.comskips the host-discovery step and treats the host as online. Use it when a firewall blocks ping-style probes but the site is clearly running. It can take longer, especially if the host really is offline.
An illustrative result looks like this.
# ILLUSTRATIVE EXAMPLE ONLY, not a real scan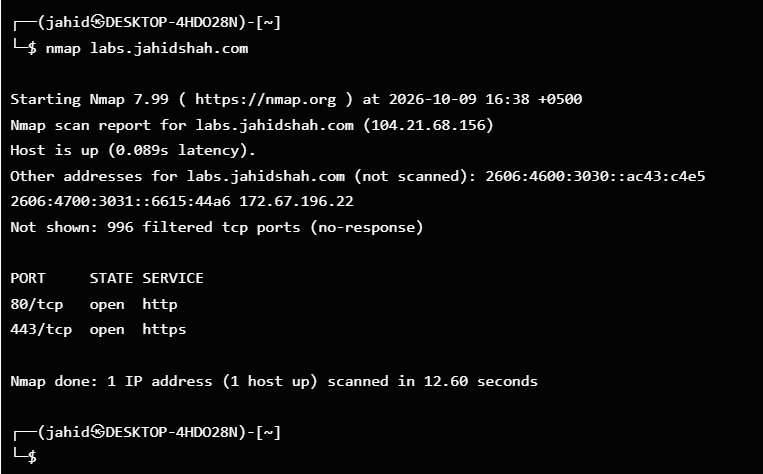
The STATE column matters. Open means a service is listening, closed means the port is reachable but nothing is listening, and filtered means a firewall or filter is hiding the answer, so Nmap cannot tell.
To check specific ports on your own server, you can add -p 80,443,3306. Adding -sV asks Nmap to identify service names and versions, which sends extra probes and is noisier, so use it only where you have permission.
If you are interested to know more about Nmap then read Nmap Complete Guide.
Common ports you will see
The exact services exposed depend entirely on the target. The table below explains the common uses of each port number in simple terms.
| Port | Service | What it usually means |
|---|---|---|
| 21 | FTP | File transfer. Often unencrypted. Rarely needed on a modern web server. |
| 22 | SSH | Remote administration. Normal on servers, but should be restricted and hardened. |
| 25 | SMTP | Mail transfer. Expected on mail servers, unexpected on plain web servers. |
| 53 | DNS | Name resolution. Expected on DNS servers, not on typical web servers. |
| 80 | HTTP | Unencrypted web traffic. Usually redirects to HTTPS. |
| 443 | HTTPS | Encrypted web traffic. Expected on any modern site. |
| 3306 | MySQL | Database. For security, this port should normally remain private and only allow connections from trusted systems, not directly from the public internet. |
| 8080 | HTTP alternate | Commonly an alternative web service, proxy or admin interface. Worth checking what it serves. |
This article stops at identifying what is exposed. Whether an exposed service is actually risky depends on its configuration and patch level, and assessing that belongs in a scoped, authorized engagement.
Step 3: Detect the website’s CMS
You can identify a website’s CMS by examining its HTML for recognizable directory names, platform-specific files, or tags that reveal which system it runs on. You can also use tools like WhatWeb or browser extensions to verify your findings. No single method is guaranteed, so compare more than one.
A CMS (content management system) is software that lets people create and manage website content without writing everything by hand. Common examples are WordPress, Joomla and Drupal. Knowing which one a site runs tells you which update and hardening practices apply, since each has its own core, plugins or modules, and typical misconfigurations.
Method 1: Read the page source
In your browser, open the page, right-click and choose View Page Source. Search for these clues.
| CMS | Common indicators |
|---|---|
| WordPress | Paths containing /wp-content/ or /wp-includes/, a <meta name="generator" content="WordPress ..."> tag |
| Joomla | A generator meta tag naming Joomla, paths such as /media/system/js/ or /templates/ |
| Drupal | A generator meta tag naming Drupal, paths such as /sites/default/files/ or /core/ (Drupal 8 and later), sometimes an X-Generator HTTP header |
You can perform the same test from your command line by sending a single request to the website. Make sure you have permission to examine the website before running the test.
curl -s https://example.com | grep -i -E "generator|wp-content|wp-includes|drupal|joomla"Real Results:

I test it on my own site. Look at the image, Since my website using WordPress, so it shows /wp-content/ or /wp-includes/ several time.
Method 2: Browser-based technology detection
Browser extensions and online profilers such as Wappalyzer, BuiltWith and Netcraft’s site report analyse the page’s scripts, headers and cookies and list the technologies they recognise. They are convenient for passive checks and a good first look before running anything yourself.
Method 3: WhatWeb on the command line
WhatWeb is an open-source fingerprinting tool, preinstalled on Kali Linux, that recognises web technologies from HTTP responses, HTML, headers and cookies. By default it uses its least aggressive mode, which needs only one HTTP request per site.
whatweb example.com
whatweb -v example.com
Illustrative output:
# ILLUSTRATIVE EXAMPLE ONLY, not a real scan

http://example.com [301 Moved Permanently] ... RedirectLocation[https://example.com/]
https://example.com [200 OK] Country[...], HTTPServer[nginx], IP[203.0.113.10],
  JQuery[3.x], MetaGenerator[WordPress 6.x], Script, Title[Example Site], WordPress
WhatWeb may report the CMS, web server software, programming language or framework, JavaScript libraries, analytics tools and sometimes version numbers. Higher aggression levels (such as -a 3) send more requests and can touch the site more heavily, so stay with the default unless you have permission for deeper checks.
Detection is not always accurate
Treat every result as a hint, not proof. Owners can remove generator tags, rename paths or put the site behind a CDN, and a headless or custom-built site may show no CMS at all. Version numbers can be hidden, outdated or deliberately misleading. A tool may also match a plugin or script and guess wrong, so confirm with a second source.
Step 4: Run basic website security checks
Basic website security checks are read-only observations of how a site is configured: whether it uses HTTPS, which security headers it sends, what it reveals about its software, and which files and services are publicly visible. They identify weaknesses without exploiting them.
Reconnaissance vs vulnerability exploitation
Reconnaissance gathers facts. Vulnerability scanning compares those facts against known weakness patterns. Exploitation actually uses a weakness to gain access or change something. This guide covers only the first and a light version of the second. Exploiting a flaw, even on a site you have been allowed to scan, needs its own explicit authorization and scope, and it is outside this article.
Check 1: HTTPS and redirects
The -I flag requests only the headers, so it is a light check.
curl -sI http://example.com
curl -sI https://example.com
The plain HTTP request should answer with a redirect (301 or 308) to the HTTPS address. If http:// serves the full site, or the HTTPS request fails with a certificate error, fix that first.
Check 2: HTTP security headers and server information
The same header output shows which protective headers are present and what the server announces about itself.
| Header | What it does | Worth noting if |
|---|---|---|
Strict-Transport-Security | Tells browsers to use HTTPS only | Missing on an HTTPS site |
Content-Security-Policy | Limits where scripts and content can load from | Missing, or very permissive |
X-Content-Type-Options | Stops browsers guessing content types (nosniff) | Missing |
X-Frame-Options or CSP frame-ancestors | Reduces clickjacking risk | Neither is set |
Referrer-Policy | Controls how much URL data is sent to other sites | Missing |
Server, X-Powered-By | Announce software and sometimes versions | They show exact version numbers |
A missing header is a hardening gap, not proof that the site is hackable. An exact version number in Server or X-Powered-By is information disclosure, because it helps someone match your software to known issues, so many owners hide or generalise it.
Check 3: TLS configuration
Nmap includes a script that lists the TLS versions and cipher suites a server offers. It sends several connection attempts, so run it only against your own or authorized systems.
nmap --script ssl-enum-ciphers -p 443 example.comLook for old protocol versions such as SSLv3, TLS 1.0 and TLS 1.1, which should be disabled, and for certificates that are expired or issued for the wrong name. Online services such as the Qualys SSL Labs test give a more detailed grade for public sites.
Check 4: robots.txt and sitemap.xml
These two public files are meant for search engines but sometimes reveal more than intended.
curl -s https://example.com/robots.txt
curl -s https://example.com/sitemap.xml
A Disallow rule that lists an admin section, backup directory, or staging folder can reveal the path to those locations. Remember that robots.txt is a request to crawlers, not access control. Anything sensitive should be protected by authentication, not hidden by a robots.txt entry.
Check 5: Version indicators and exposed services
Look back at what Steps 2 and 3 produced. A visible CMS version, a theme or plugin path with a version string, or an exposed database or admin port are the findings that matter most. Compare any version you can see with the vendor’s current release and security advisories. Mark versions that look outdated as items to verify, since version strings are not always reliable.
Other publicly visible configuration mistakes
Some of the most common findings need no tool at all, only careful reading of what the site already shows you in a browser. Review these on your own site:
- Directory listings: a folder URL that shows an index of files instead of a page.
- Default or install pages: a leftover server welcome page, sample app or setup screen.
- Verbose error pages: messages that reveal file paths, software versions or database details.
- Exposed admin or login pages: Control panels that anyone can reach without IP-based access limits or an extra verification step, such as two-factor authentication.
- Mixed content: an HTTPS page that loads scripts or images over plain HTTP.
- Leftover files: backups, old copies or logs linked from pages or listed in sitemap.xml.
Note what is visible and why, but do not guess at hidden paths or try to log in. Guessing is no longer observation, and it needs explicit scope in a real engagement.
Check 6: A general web server scanner (Nikto)
Nikto is an open-source web server scanner that checks for dangerous files, outdated server software and common misconfigurations. It sends a large number of requests, so it is loud, can trip alerts, and can slow a small server.
nikto -h https://example.comRun it only with written permission and, ideally, in an agreed testing window. Treat its output as leads to verify, since scanners produce false positives and miss things.
How to read your reconnaissance results
Recon output only becomes useful when you connect the findings. The usual workflow runs from least to most intrusive.
- Confirm authorization and define scope (domains, IP ranges, allowed times).
- Resolve the domain with
digornslookup, and note whether the addresses look like a CDN or hosting provider. - Scan common ports with Nmap and list the open services.
- Identify the CMS and technologies with page source and WhatWeb.
- Check HTTPS, headers, TLS and public files with curl and Nmap scripts.
- Record, prioritise and fix, then re-check after changes.
| What you find | What it may mean | Sensible next step |
|---|---|---|
| IP belongs to a CDN or proxy | The origin address is not visible from DNS alone | Note it. Do not assume the origin is exposed |
| Only ports 80 and 443 open | Small, expected web attack surface | Keep it that way |
| Port 3306, 21 or an admin port open to the internet | A service is reachable that probably should not be | Restrict it with a firewall or VPN, then re-scan |
| WordPress 5.x in generator tag | Possibly outdated core software | Verify the real version and update |
No Strict-Transport-Security header | HTTPS is not enforced in browsers | Add the header after testing |
Server: Apache/2.4.xx with full version | Version disclosure | Reduce what the server announces |
What an attacker or a defender can learn is the same set of facts: addresses, exposed services, software names and versions, and configuration gaps. Recon rarely proves a vulnerability, but it shows where to look, and that is why owners should look first.
Common mistakes beginners make
- Scanning without permission. The most serious mistake. Curiosity is not authorization.
- Treating ping failure as “site down”. Many hosts block ICMP. Check with a browser,
curlornmap -Pn. - Assuming the IP is the real server. It may be a CDN or proxy edge.
- Trusting one tool. CMS and version detection can be wrong. Cross-check.
- Running aggressive scans first. Start with the lightest checks, since noisy scans can trigger blocks or strain small servers.
- Confusing findings with vulnerabilities. An open port or a version string is a lead, not proof.
- Not keeping notes. Record commands, times and output, so results can be reproduced and verified.
How website owners can defend against reconnaissance
You cannot stop all reconnaissance, since a public website must reveal some things to work. You can reduce what it reveals and make sure what is visible is safe.
- Expose only what is needed. Close or firewall every port except 80 and 443 for a normal web server. Keep databases such as MySQL on a private network, and limit SSH to known addresses or a VPN.
- Keep software updated. Update the CMS core, themes, plugins and server software promptly. Removing a version number helps a little, but patching is what actually fixes the problem.
- Add security headers. Enforce HTTPS with HSTS and add Content-Security-Policy,
X-Content-Type-Optionsand a Referrer-Policy. - Reduce information leakage. Trim
ServerandX-Powered-Bydetails, remove unneeded generator tags, and keep sensitive paths out of robots.txt and sitemaps. - Use a CDN or reverse proxy with care. It can hide your origin and add filtering, but only if the origin accepts traffic from the proxy and not from the whole internet.
- Harden TLS. Disable old protocol versions and renew certificates before they expire.
- Monitor logs and set alerts. Repeated port probes and scanner user agents are visible if you look.
- Scan yourself regularly. Run the same checks from this guide on your own site after every major change.
A good habit: perform these checks on a schedule and keep the results, so you notice drift when a new service or a stale plugin appears.
FAQ on Website Reconnaissance
1. How do I find the IP address of a website?
Run ping example.com, nslookup example.com or dig +short example.com. The address shown is what the domain’s DNS records currently point to. It may belong to a CDN or proxy.
2. Can I find a website IP using ping?
Yes. The first line of ping’s output shows the IP address the domain resolved to, even if the site does not answer the pings themselves.
3. Does ping always reveal the real server IP?
No. If the site uses a CDN, reverse proxy or load balancer, ping shows that front layer’s address, not the origin server’s. Results can also vary by location and time.
4. Can a website hide its IP address?
In practice, a site can hide its origin by serving traffic through a CDN or reverse proxy and by accepting direct connections only from that proxy. The proxy’s address remains public, and misconfiguration can still leak the origin.
5. How do I scan a website for open ports?
Use Nmap against a site you own or are authorized to test, for example nmap example.com, or nmap -Pn example.com if the host blocks ping-style discovery. It reports open, closed and filtered ports.
6. What does Nmap show?
By default it shows which of the most common TCP ports are open, closed or filtered and the typical service name for each. With options such as -sV it can also try to identify service versions.
7. How can I tell what CMS a website uses?
Look for clues in the website’s HTML, such as /wp-content/ directories or generator tags. You can also use a browser-based technology checker or run whatweb example.com in your terminal to identify the platform. Confirm with a second method, because detection is not always accurate.
8. Can I scan a website without permission?
You should not. Scanning systems you do not own or have permission to test can violate laws, acceptable use policies and workplace rules, even if no damage is done. Get written authorization first.
9. What is the difference between reconnaissance and vulnerability scanning?
Reconnaissance collects information about a target, such as IPs, ports and technologies. Vulnerability scanning checks that information against known weakness patterns. Neither is exploitation, but both are active and need permission.
10. Is Nmap legal to use?
Nmap is legal software and widely used for network inventory and security audits. Whether a particular scan is legal depends on whether you are authorized to scan the target and on local law.
If you are interested on Kali-Linux tools then read our article Best Kali Linux Tools.
Conclusion
Website reconnaissance is a simple, repeatable habit: resolve the domain, see which ports answer, identify the CMS and check a few basic security settings. Used on systems you own or are allowed to test, these steps turn a vague worry into a short list of fixable items. Keep the order light to heavy, treat every result as a lead to verify, and always keep permission in writing.
Discover more from Jahid Shah
Subscribe to get the latest posts sent to your email.