




Open source intelligence, or OSINT, means collecting and analysing information that is already publicly available: DNS records, certificate logs, search engine results, code repositories, public company data, breach notifications and more. No hacking is involved in the sense of breaking in. The skill is in finding the right public pieces and understanding what they reveal when put together.
That matters in cybersecurity because organisations leak more than they realise. A forgotten subdomain, an email address in a public repository or a certificate for a test server can all become part of someone’s picture of your attack surface. Security professionals use OSINT to see that picture first, so they can fix gaps before someone else uses them.
Choosing the right tool changes how fast you get there and how much you can trust the result. This guide covers three well-known cybersecurity OSINT tools: theHarvester, SpiderFoot and Maltego. If you arrived from my Facebook Reel looking for the links, each section has the official source directly under it.
Authorized use only. Everything in this article assumes you are working on systems and data you own, or have written permission to assess. Practice in a lab.
1. theHarvester

What Is theHarvester?
theHarvester is an open source command-line reconnaissance tool. You give it a domain, and it queries many public sources to collect information about that domain. It is designed for the early reconnaissance stage of an authorized security assessment.
The problem it solves is simple: manually checking dozens of search engines, certificate logs and data providers is slow. theHarvester queries them in one run and combines the results.
What Can theHarvester Do?
According to its official README, theHarvester pulls from search engines, certificate transparency logs, DNS datasets, code repositories, threat intelligence platforms and other public sources. Depending on the sources you choose, it can collect:
- Hostnames and subdomains
- Email addresses
- IP addresses and ASNs
- URLs
- Names of people
- Names of publicly reported data breaches
Some capabilities go beyond passive collection. The project separates passive sources from DNS actions (such as resolving or brute-forcing names) and from direct actions (such as taking screenshots or checking for subdomain takeover). Those active options only run if you select them, and the project’s own guidance is to use them only against targets you own or have explicit permission to test.
Two honest limits to keep in mind:
- Results depend on third-party providers. Their availability, quotas and formats change independently of the tool, and some sources require API keys.
- It reports what public sources contain. It does not prove that a hostname is live, that an email is valid or that something is vulnerable.
Basic Usage (Authorized Lab Only)
theHarvester is run from the command line. The project’s current README uses the uv package manager and states a recent Python version requirement, so check the installation guide in the repository before you start, because requirements change between releases.
A passive query against a domain you own looks like this (replace example.com with your own domain or a lab domain):
bash
git clone https://github.com/laramies/theHarvester.git
cd theHarvester
uv sync
uv run theHarvester -d example.com -b crtsh,certspotter
What this does, in plain English:
-dsets the target domain.-bchooses the data sources.crtshandcertspotterare certificate transparency sources that do not need an API key.- Results print to the terminal. Adding
-f reportsaves them in structured formats.
Start with a small number of passive sources and compare the output with what you already know about your own domain. That is the best way to learn what the results look like and where they are wrong. Run uv run theHarvester -h to see the options, and read the repository’s “Responsible use and scope” page before trying anything beyond passive sources.
Why Is theHarvester Useful?
- Attack surface discovery: it surfaces subdomains and hosts you may have forgotten.
- Security assessments: it gives testers a fast starting inventory at the beginning of an authorized engagement.
- Reconnaissance: it shows what an outsider can learn without touching your systems.
- Threat intelligence: it helps connect a domain to related infrastructure and public mentions.
- Exposed information: it can reveal email addresses and URLs that appear in public places.
How Could Attackers Abuse It?
At a high level, the same public data that helps defenders also helps people with bad intentions. Lists of subdomains can point to neglected or poorly protected services. Collected email addresses and names can help someone profile an organisation, work out who works there and decide whom to target with phishing.
This is exactly why defenders run these tools against themselves first. If theHarvester can find it about your organisation, so can anyone else. The fix is not to avoid the tool but to reduce what is exposed: retire unused hosts, limit what appears in public repositories and train staff to expect targeted phishing.
Official GitHub Repository
The official theHarvester repository is github.com/laramies/theHarvester. It is maintained under the account of its creator, Christian Martorella (laramies), and the README credits the current maintainers.
2. SpiderFoot
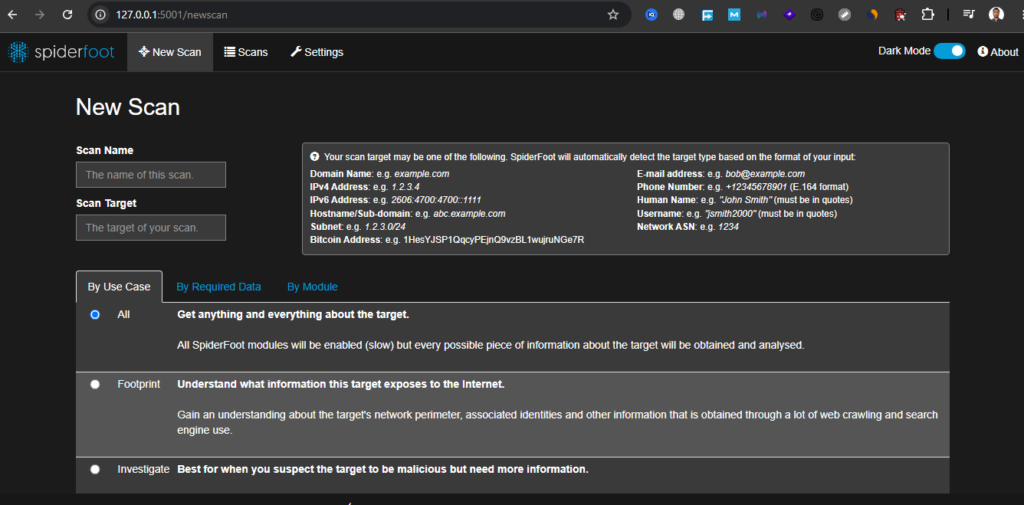
What Is SpiderFoot?
SpiderFoot is an open source OSINT automation tool. Its repository describes it as a tool that automates OSINT for threat intelligence and mapping your attack surface. It is written in Python and released under the MIT license.
Where theHarvester focuses on a domain and a set of well-known sources, SpiderFoot is a broader framework. You give it a target, and it runs many modules that feed each other.
What Can SpiderFoot Do?
The official README says SpiderFoot has over 200 modules and can be used through a built-in web interface or entirely from the command line. A scan can start from several kinds of target, including:
- IP addresses, domains and subdomains
- Hostnames and network ranges
- ASNs
- Email addresses, phone numbers and usernames
- Names
The modules work in a publisher/subscriber model. When one module finds something, such as an IP address from a domain, other modules that handle IP addresses pick it up and continue. Examples of what the modules cover include subdomain and hostname discovery, DNS records, threat intelligence and blacklist checks, breach lookups through services such as Have I Been Pwned, certificate analysis, web technology identification and metadata analysis. Version 4.0 added a correlation engine with pre-defined rules that group related findings, and results can be exported as CSV, JSON or GEXF.
How automation makes it different. With theHarvester you pick sources and review what comes back. With SpiderFoot you pick a target and a scan profile, and the tool decides what to look up next based on what it finds, then correlates the results across modules. Done manually, the same investigation would mean copying a result from one site into another dozens of times. The trade-off is that automation produces a lot of data, and you need to review it with care.
Two limits to be aware of:
- Many modules rely on third-party services, and some of those need API keys or have free-tier limits.
- Some modules go beyond passive collection (for example port scanning or crawling a website), and SpiderFoot can call other tools such as Nmap. Only use those against systems you are authorized to test.
Basic Usage (Authorized Lab Only)
The repository’s README recommends the packaged stable release and requires Python 3 and the libraries in requirements.txt. The web interface is started like this:
bash
git clone https://github.com/smicallef/spiderfoot.git
cd spiderfoot
pip3 install -r requirements.txt
python3 ./sf.py -l 127.0.0.1:5001
Then open http://127.0.0.1:5001 in your browser. The 127.0.0.1 address keeps the interface reachable only from your own machine, which is what you want for a lab.
A beginner-friendly first scan:
- Click New Scan and give it a name.
- Enter a domain you own, or a lab domain, as the target.
- Choose a scan profile. SpiderFoot offers profiles by use case, and a passive-style profile is the right choice when you are learning because it limits interaction with the target.
- Run the scan and review results by module and by data type.
- Read the correlation results to see which findings the tool considers related.
The README notes that master can include features that are not fully tested, so a packaged release is the safer starting point.
Why Is SpiderFoot Useful?
- Defensive attack surface mapping: it shows what your organisation exposes across many sources at once.
- Threat intelligence enrichment: it checks hosts and IP addresses against many reputation and blacklist sources.
- Time saving: automation handles the repetitive lookups.
- Correlation: related findings are grouped so you can spot patterns more easily.
- Flexibility: the same tool can be used for a quick passive check or a deeper authorized assessment.
How Could Attackers Abuse It?
Because SpiderFoot automates broad collection, it can also speed up profiling for someone with bad intentions: a wide view of an organisation’s domains, infrastructure, exposed services and linked accounts in a single pass. The project itself notes it can be used offensively in a red team exercise as well as defensively.
The defensive lesson is the same: run it against your own footprint, look at what it correlates and close the gaps. Treat an unexpected finding, such as an old subdomain pointing at a service you no longer manage, as a to-do item.
Official GitHub Repository
The official SpiderFoot repository is github.com/smicallef/spiderfoot, and the project website is spiderfoot.net. The repository also mentions SpiderFoot HX, a separate cloud-hosted, managed version with extra features. That is a different product from the open source tool.
3. Maltego

What Is Maltego?
Maltego is a commercial investigation and link analysis platform from Maltego Technologies. Its defining idea is the graph: instead of lists of results, you see information as connected nodes on a canvas.
If you are searching for a Maltego GitHub repository, here is the honest answer. Maltego is not an open source tool, and there is no official GitHub repository for the Maltego application. It is distributed from the company’s own website. That is the main way it differs from the other two tools.
What Can Maltego Do?
Maltego’s core concepts are easy to grasp once you see them:
- Entities are the things on the graph: a domain, an IP address, an email address, a person, a company, a website.
- Relationships are the links between entities, such as “this domain resolves to this IP address”.
- Transforms are the actions that expand the graph. You select an entity, run a transform, and Maltego queries a data source and adds the results as new connected entities.
So a fictional example might start with one entity, example.com, and use transforms to add the IP addresses it resolves to, the name servers it uses and the other domains hosted nearby. The picture shows how things connect, which a flat list cannot.
According to the company’s website, Maltego offers multiple products, including Maltego Graph for link analysis, Maltego Search for quick OSINT searches and Maltego Monitor, plus a data marketplace with a large number of data partners. Data sources are accessed through connectors, and some data providers are paid.
A limit worth stating: Maltego is a platform for analysis and visualization. The quality of what you see depends on the data sources you connect and the judgment you apply.
Basic Usage (Authorized Lab Only)
Maltego is a point-and-click application rather than a command-line tool:
- Create a Maltego ID on the official website and download the client from the official downloads page. The “use for free” page describes free access with a Maltego ID, and plan limits, such as usage credits and available features, change, so check the pricing page for current details.
- Start a new graph.
- Drag an entity onto the canvas, for example a Domain entity with the value
example.com, or a domain you own. - Right-click the entity, choose a transform and run it.
- Expand the graph one step at a time and ask at each stage whether a connection is meaningful or just coincidence.
For practice, use fictional or example data, or your own infrastructure. Keep each investigation in its own graph and note which transform produced each node.
Why Is Maltego Useful?
- Relationship analysis: it reveals links between infrastructure, accounts and organisations that are hard to see in tables.
- Visual communication: a graph is easier to explain to a manager or client than a spreadsheet.
- Threat investigation: analysts use it to map related domains, hosting and indicators.
- Extensibility: Organizations can add their own data sources and create custom tools to connect and analyze that information. Maltego publishes developer SDKs on GitHub for that purpose.
- Documentation of work: graphs can serve as a visual record of an investigation.
How Could Attackers Abuse It?
Link analysis is powerful for mapping how people and organisations connect. In the wrong hands it could be used to profile a target by joining scattered public details into one picture. That is also why this article, and Maltego’s own positioning around investigations, depends on authorization and ethics. The risk is greater when the subject is a person rather than a company’s infrastructure.
For defenders, the lesson is to look at your organisation the way Maltego would, and ask what a stranger could connect: which public details link staff, domains and systems together.
Official Source (There Is No Official Client Repository)
- Official website: maltego.com
- Official downloads: maltego.com/downloads
- Free access with a Maltego ID: maltego.com/use-for-free
- Official documentation: docs.maltego.com
Maltego does maintain an official GitHub organisation, github.com/MaltegoTech, but it is for developers building transforms and integrations, not for downloading the Maltego application. The current SDK is maltego-transforms. The older maltego-trx library is archived and marked as legacy by its owner. If a GitHub repository claims to be “Maltego” and offers a cracked or free copy of the application, treat it as unofficial and unsafe.
theHarvester vs SpiderFoot vs Maltego
| Tool | Best For | Automation | Visualization | Beginner Friendly | Typical Use |
|---|---|---|---|---|---|
| theHarvester | Quick domain reconnaissance from many public sources | Moderate: runs the sources you choose in one command | Limited: terminal output and exports; newer versions include a local web interface | Moderate: simple commands, but needs command-line comfort and some API key setup | Early-stage inventory of hostnames, emails and IPs for a domain you are authorized to assess |
| SpiderFoot | Broad, automated OSINT and attack surface mapping | High: modules trigger each other and results are correlated | Moderate: web interface with views and charts, plus exports | Moderate to good: web interface helps, but results can be overwhelming | Self-assessment of your footprint, threat intelligence enrichment |
| Maltego | Relationship and link analysis | Semi-automated: you choose the transforms and expand the graph | High: graph-based by design | Good for the interface, but it takes time to learn the concepts; free access is limited | Investigations where connections matter, reporting and analyst workflows |
No row in this table means a tool is “the best”. They answer different questions.
Which OSINT Tool Should You Choose?
Choose theHarvester when…
- You want a fast, lightweight first look at a domain you own or are authorized to test.
- You are comfortable in a terminal and want output you can script or save.
- You may need to use the collected hostnames or email addresses in a later stage of the security assessment.
Choose SpiderFoot when…
- You want broad coverage without manually chaining lookups.
- You are checking your own organisation’s exposure across many sources.
- You want correlation and threat intelligence checks in one place, and you are happy to set limits on what the scan can touch.
Choose Maltego when…
- The question is “how are these things connected?” rather than “what exists?”.
- You need a visual result to explain findings or share with a team.
- You are doing investigation or analyst-style work and can work within its licensing and data source costs.
Using more than one tool. In an authorized investigation, the tools complement each other. A common pattern is to get a quick inventory with theHarvester, run a broader SpiderFoot scan to widen and correlate it, then bring the key entities into Maltego to examine relationships and present the story. Whenever tools disagree, treat the disagreement as a reason to verify, not as noise.
Also, learn ESP32 Cybersecurity: Why It Matters for IoT Security.
OSINT and Ethical Use
OSINT tools are legal to download and study in most places, but how you use them can still cross legal and ethical lines. Make these habits practical:
- Get authorization first, in writing. Define the target, the scope and which actions are allowed. “Passive only” and “active testing allowed” are different permissions. If you are unsure whether a source or module touches the target directly, assume it does until you have checked.
- Remember that public does not mean harmless. A list of employee names and email addresses is public, yet it is still sensitive. Collect only what the assessment needs, store it securely and delete it when the engagement ends.
- Respect privacy and applicable laws. Rules on data protection, scraping and terms of service differ by country and by data source. If you are working professionally, ask for legal guidance.
- Never use these tools to stalk, harass, doxx, impersonate or target an individual. A person’s profile, location or relationships are not a training exercise. Keep practice on organisations you control.
- Learn in a controlled lab. Use your own domain, a deliberately set-up test environment or fictional data. Notice what the tools return for a target whose answers you already know.
- Protect your API keys and results. Keep keys out of public repositories and keep scan output out of source control. The theHarvester documentation makes the same point.
Common Mistakes Beginners Make
- Treating every result as accurate. Public data is old, incomplete and sometimes wrong.
- Not verifying findings. Confirm that a host really belongs to the target and is still live before reporting it.
- Confusing public information with permission. Something being visible does not give you the right to probe it.
- Relying on a single source. Each provider has gaps and biases. Cross-check.
- Collecting excessive personal information. Gather what the objective needs, not everything you can find.
- Ignoring false positives. Shared hosting, reused names and stale records create convincing but wrong links, especially in graphs.
- Not documenting source and context. Record where each finding came from, when you collected it and which tool or module produced it. Without that you cannot defend or repeat your work.
Frequently Asked Questions
1. What are OSINT tools?
OSINT tools collect and organise publicly available information, such as domain records, certificates and public profiles, so analysts can study it. In cybersecurity they are used to understand what an organisation exposes.
2. What is theHarvester used for?
theHarvester gathers hostnames, subdomains, email addresses, IP addresses and related details about a domain from public sources, typically during the early reconnaissance stage of an authorized assessment.
3. Is SpiderFoot free?
The open source SpiderFoot tool is free and MIT-licensed. SpiderFoot HX is a separate managed, cloud-based product with additional features. Some data sources used by SpiderFoot modules need API keys or have free-tier limits.
4. Is Maltego free or open source?
Maltego is not open source. Although it is a commercial platform but also it offers free access with a Maltego ID, with limits that depend on the plan. Check the official pricing and “use for free” pages for current terms.
5. Which OSINT tool is best for beginners?
It depends on your comfort level. theHarvester suits people who like the command line, SpiderFoot’s web interface lowers the barrier for broad scans, and Maltego’s graph helps visual learners. Any of them is best learned on a domain you own.
6. Is it legal to use OSINT tools?
Downloading and studying them is generally fine, but what you target matters. Only assess systems and data you are authorized to examine, and follow local laws and the terms of the data sources. This is general information, not legal advice.
Also, learn Best Hacking Operating Systems: Kali, Parrot, BlackArch, Tails & CAINE.
Final Takeaway
theHarvester, SpiderFoot and Maltego solve related problems in different ways. theHarvester is a command-line (CLI) focused tool for quick domain reconnaissance. SpiderFoot automates and correlates a wide range of lookups, which suits attack surface mapping. Maltego turns information into a graph so you can see relationships, but it is a commercial platform with licensing and data costs rather than an open source project.
OSINT remains important in cybersecurity because the information an attacker needs is often already public. These tools help defenders see their own exposure first. They are most valuable when combined with human analysis, verification and proper authorization, because a tool can collect data but only a person can judge what it means and whether collecting it was appropriate.
Official sources, at a glance
- theHarvester: github.com/laramies/theHarvester
- SpiderFoot: github.com/smicallef/spiderfoot
- Maltego: maltego.com/downloads (no official client repository; developer SDKs at github.com/MaltegoTech)